Sunday, October 12, 2014

LM386 Audio amplifier

It is long time since I did anything in analog circuits, so this weekend was spent in analog circuits.

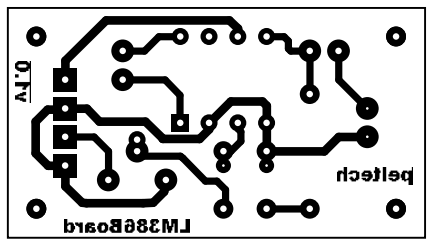
I was working on creating sound from one micro controller board and wanted the sound to be audible through a loud speaker. This called for a small audio amplifier and I had LM386 (old but still useful) in the junk box, so I set out to create a small board for it.

The schematic:

The PCB design:


Printer toner transfer, etched and drilled board:
(few holes were not perfect, first time trying my new Dremel tool for PCB drilling)


Assembled board:

Saturday, October 4, 2014

From India, buying electronic components in Taobao

For my hobby projects, I buy electronic components from various online electronics shops in India. Time to time I buy components (not available or costly in local stores) from ebay.com. However last few buys from ebay.com (sellers obviously from China) did not reach me (waited for 40days).

So I was looking for other options to buy electronic components from China. Looked like Taobao is another option which I thought will explore.

Taobao is a Chinese consumer to consumer market place belonging to Alibaba group (yes the US$ 25 billion eCommerce giant). Buying from Taobao from other countries could be difficult because of language (Taobao site is in Chinese). I think this opened lot of business opportunities for others. There are so many agents in China who operate a website in English for overseas buyers and the process goes typically like
  1. You find out the items in Taobao site
  2. Share the item link in the agent web page
  3. Pay agent to buy the item along with a local courier fee
  4. Payment also includes a transaction fee for the payment platform operator say Paypal
  5. Agent buys it for you
  6. Item reaches agents warehouse
  7. Calculate weight and select shipment mode
  8. Pay service fee to agent and shipment fee
  9. Agent ships items and provides courier tracking number
Looking at various online reviews I have chosen www.yoybuy.com for my first purchase. They charge 10% service fee (US$ 5.69 min), their local courier fee around US$2.02 and the DHL shipment fee to India is around US$20 for first 500gms.

Having chosen the agent, I logged my first order for around US$20 on 22/10/2014. I most of the items reached agent's warehouse by 29/10/2014. To optimize internationl shipment charges, I placed one more order and waiting for the material arrival at agent's warehouse. 

Within a weeks time all material arrived at Yoybuy site and I selected all for shipment. At this point of time the commission of 10% order value or a min 5.x USD, shipment charges and custom clearance charges to be paid. Insurance payment also there as on option but I did not choose it. Looking at shipment mode, somehow DHL was not getting enabled it was around 20+USD so I have chosen Aramex. Aramex charges were USD9.x for first 500gram and it is very nominal. I paid all these using paypal (paypal charges some transaction fee of around 4.5%).

The same day Yoybuy shipped it and the next day I got Aramex tracking number. Being a Gulf based company, Aramex shipment first went to Dubai and from Dubai it came to Bangalore via Chennai customs. It took a week for the parcel to arrive in Bangalore. Only thing is customs charged me some 1250 INR and Aramex added some clearance charges of INR 150. (see more input in my reply below in response to a query).

Overall not bad, variety of items I got it within reasonable time. Yes there are variety of charges but I think in the end we can end getting some latest or difficult to items in less cost. Customs good be a spoiler because of the unpredictability in levying customs charges. If it is nominal say 10 to 20% actual cost then it is very good option to buy. But if customs thinks the parcel undervalued and treats it as a higher value item then the customs will be high and in the we could end up paying higher cost for the items.... 

Wednesday, October 1, 2014

Arduino Clock with control from Android phone

It is some time since I played around with Arduino. My daughter wanted me to show her something other than blinking some LED's. So I promised to build something for her which she could control from her Samsung Galaxy Tab2.

I quickly put together an Arduino, small bredboard shield, 4digit 7-segment display, DS1307 RTC chip and made it up & running. See below the clock working...


Schematic is given below

Saturday, May 10, 2014

STM32F103ZET6 - WB-RedDragon103 - Development board

I wanted to have a board with STMicro controller with all the bells and whistles. My search in ebay narrowed to http://www.ebay.com/itm/321103107512?_trksid=p2059210.m2749.l2649&ssPageName=STRK%3AMEBIDX%3AIT which is priced at US$ 65 which is very good bargain.

So I ordered it on April 13th and got in my local area post office on 5th May but with a catch. They asked me to pay a duty of Rs 2105 so the total cost become Rs 2105 + US$ 65. Still I do not regret buying it. See image below.


Will share more details as I play with it.

Sunday, February 23, 2014

Getting around with Beaglebone Black

It is almost a year back since I got Beaglebone Black and thought I will play around with a bit. This blog is to share my experience with Beaglebone Black.

Getting it - I bought it from kits'n'spares site (if you are reading this blog from India, the link is http://shopping.kitsnspares.com/bon1/index.asp ). Looks like they have a tie up with online shopping giant element14 and we can get element14 items from kits'n'Spares. May be not all items are available but I found whatever I wanted so far. It's part number from element14 site is "BB-BBLK-000" and same was available from kits'n'Spares. The version I got is A5A.

Readme first - First thing to do after getting such a development board is to read about it and I am giving below the sites which I have gone through in the process.
  1. http://beagleboard.org/Products/BeagleBone+Black -> Getting started page at beagleboard.org
  2. http://elinux.org/Beagleboard:BeagleBoneBlack -> Wiki page for beaglebone black
  3. https://github.com/CircuitCo/BeagleBone-Black/ -> Design and technical documents at github
  4. https://github.com/jadonk/beaglebone-getting-started/tree/sysco-ch-signed-drivers/Drivers/Windows -> Drivers for Beaglebone Black with factory installed Angstrom image
  5. http://sourceforge.net/projects/androidonbeaglebonebtutorials/files/ -> Some tutorials
  6. http://elinux.org/Beagleboard:Android -> Getting android image and running it
  7. https://code.google.com/p/rowboat/wiki/JellybeanOnBeaglebone_WithSGX -> Building Android JB for beaglebone black - remember to set TARGET_PRODUCT=beagleboneblack in make commands
  8. http://processors.wiki.ti.com/index.php/TI-Android-JB-4.2.2-DevKit-4.1.1_DeveloperGuide -> Android developer guide at TI website
Power ON: Connected BBB (yes from now on, I will call Beaglebone Black in short as BBB) to my laptop serial port. I used a CP2012 USB to Serial convertor to connect debug serial port in BBB to laptop (J1 connector pint out is 1-GND, 4-Tx(BBB side), 5(Rx from BBB side). I could get the factory installed Angstrom up & running. Got the boot messages in in laptop using a terminal utility hercules. See images below


Running Android JB: Rather than trying a prebuilt image, I wanted to build the image myself. I followed the instruction in link #7. I just noted the steps below for easy reference (line proceeded with $ to be entered in Ubuntu 12.04 shell prompt; of course without the $ symbol).

Build environment:
  1. Ubuntu 12.04 64bit (I used Ubuntu 12.04 running in Virtualbox)
  2. Host is HP Pavilion 15-n003tx Laptop with Intel Core i5 4200U @ 1.6Ghz CPU, 8GB memory, 1TB HDD
  3. Ubuntu VM was configured with 2 CPU and 4GB memory, 150GB virtual HDD space
  4. Content of the build director came around 70GB (sorry I did not check the download size)
  5. It took me around 5hrs to download and build 

Build steps:
  1. $ sudo apt-get install git gnupg flex bison gperf build-essential \
  2.   zip curl libc6-dev libncurses5-dev:i386 x11proto-core-dev \
  3.   libx11-dev:i386 libreadline6-dev:i386 libgl1-mesa-glx:i386 \
  4.   libgl1-mesa-dev g++-multilib mingw32 tofrodos \
  5.   python-markdown libxml2-utils xsltproc zlib1g-dev:i386
  6. $ sudo ln -s /usr/lib/i386-linux-gnu/mesa/libGL.so.1 /usr/lib/i386-linux-gnu/libGL.so
  7. $ sudo apt-get install minicom tftpd uboot-mkimage expect
  8. Download JDK from http://www.oracle.com/technetwork/java/javase/downloads/java-archive-downloads-javase6-419409.html#jdk-6u33-oth-JPR
  9. $ cp jdk-6u33-linux-x64.bin ~/
  10. $ cd ~
  11. $ chmod a+x jdk-6u33-linux-x64.bin
  12. $ ./jdk-6u33-linux-x64.bin
  13. $ export PATH="$HOME/jdk1.6.0_33/bin:$PATH"
  14. $ mkdir ~/bin
  15. $ PATH=~/bin:$PATH
  16. $ curl https://dl-ssl.google.com/dl/googlesource/git-repo/repo > ~/bin/repo
  17. $ chmod a+x ~/bin/repo
  18. $ mkdir ~/rowboat-android
  19. $ cd ~/rowboat-android
  20. $ repo init -u git://gitorious.org/rowboat/manifest.git -m rowboat-jb-am335x.xml
  21. $ repo sync $
  22. $ export PATH=<android source>/prebuilts/gcc/linux-x86/arm/arm-eabi-4.6/bin:$PATH
  23. $ cd u-boot
  24. $ make CROSS_COMPILE=arm-eabi- distclean
  25. $ make CROSS_COMPILE=arm-eabi- am335x_evm_config
  26. $ make CROSS_COMPILE=arm-eabi- 
  27. $ make TARGET_PRODUCT=beagleboneblack OMAPES=4.x
  28. $ cd <android source>
  29. $ make TARGET_PRODUCT=beagleboneblack fs_tarball
  30. $ mkdir ~/image_folder
  31. $ cp <android source>/kernel/arch/arm/boot/uImage ~/image_folder
  32. $ cp <android source>/u-boot/MLO ~/image_folder
  33. $ cp <android source>/u-boot/u-boot.img ~/image_folder
  34. $ cp <android source>/external/ti_android_utilities/am335x/u-boot-env/uEnv_beagleboneblack.txt ~/image_folder
  35. $ cp <android source>/out/target/product/beagleboneblack/rootfs.tar.bz2 ~/image_folder
  36. $ cp <android source>/external/ti_android_utilities/am335x/mk-mmc/mkmmc-android.sh ~/image_folder
  37. $ cd ~/image_folder
  38. $ sudo./mkmmc-android.sh <SD card device e.g.:/dev/sdc> MLO u-boot.img uImage uEnv_beagleboneblack.txt rootfs.tar.bz2
BBB booted successfully from Android.